And the Matamata Hotsprings! Yes Baypark, and Puke. A Standard 8 was good for that as there was no bootlid for the security guys to open and seeOriginally Posted by khyndart in CA


And the Matamata Hotsprings! Yes Baypark, and Puke. A Standard 8 was good for that as there was no bootlid for the security guys to open and see

Great work Paul. Looking really good.
Yes we use to try hiding in the boot to get into the Drags at Meremere....never worked !

Thanks Guys,
I used to own a 1960 Ford Fairlane 4 door (AKA the Mothership) I am pretty sure we fit 3 in the trunk of that one time.
Old fart have you been sprung, by Ken?
Cheers

Wow, great work Paul! This thing is just looking so good! And you're getting close now!
Last century a bunch of us got in to Puke several times beneath a tarp on Bryan Faloon's trailer.
Thanks Steve, I only have seam sealing to do now. The painter is coming on Thursday to have a look at the car. It has been a mammoth task integrating the fiberglass panels but most rewarding now to see it done and functional.
Cheers
Also,
Nice to also see everyone fessing up to days gone by from last century ^^
We were poor then, and you think licking tar from t'road was bad, we had it tough....We got evicted from our hole in t'road
Ahhh the good old days!
Here is a great link to a web site about Graham Hill, a great story and some great pictures. The site looks like its South American, so as you scroll down select english language, the translations are not the best but worth a look.
http://www.pilotos-muertos.com/2017/Hill%20Graham.html
I took a break from sanding and finished engineering the gearbox cross-member. Holman Moody made a reinforced cross-member for these cars. The factory OEM cross-member is somewhat flimsy and only has 1 bolt holding the entire gearbox mount in.
This is a pic of the OEM cross-member (the leaf spring on this is for a 6cyl and auto models)
So the reinforcing was 2 pronged:
1. reinforce the cross-member with 2 x 3mm steel plates which support the chassis mount points and welded in 2 x 3mm cross plates to the 2 new chassis mounts to support the actual rubber mount point, which is then bolted to the new structure.
2. So I needed to look at the single bolt, so I fabricated a 2mm steel plate which captures the gearbox mount spring, should the bolt fail, the new capture plate will support the gearbox so as to overt a disaster on the track.
It looks relatively simple but it was quite a bit of engineering to finish correctly. (The leaf spring on my part is for the 4 speed models only)
Last edited by Paul B; 05-25-2018 at 11:52 PM. Reason: typo
Paul,
You continue to amaze. That is beautiful work my friend.
Ken.
Thanks very much Ken.
Its all coming together nicely, hopefully it will be in the paint shop in about 1-2 weeks (For Primer) depending on how busy the painter is.
Wimbledon white is the colour for the outside.
Cheers
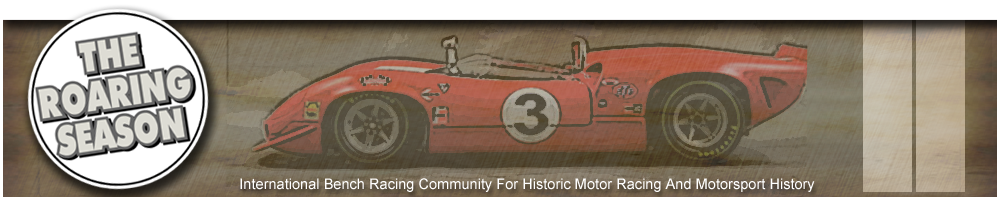
I have been finishing the car for paint but in between I have designed the front and rear tow hooks and had them water jet cut from my design, finished and painted, Its 9mm medium tensile steel
Here is a pic of the water cut job as I got it back
And here is a pic' of the finished product, deburred & all prettied up
Last edited by Paul B; 07-31-2018 at 10:21 AM.
I have finished the seam sealing, quite a big job and very messy. I followed the original workshop manual for this job plus remembered many spots that were not in the manual such as the roof drip rail and the inner, lower rear quarter below the rear quarter window etc.
The original 1960s seam sealer hardens after 50 years and cracks. This was all removed when the car was dip stripped
The modern seam sealer is very strong and durable stuff, it also has a level of flexibility and does not split or crack, and looks exactly the same as the original stuff.
When applied to a correctly to a prepared surface, it not only seals all the spot weld construction points/seams but it also adds a very strong bracing factor which supports the spot welds and seams.
Once the fire wall and inner fenders are painted semi gloss black it will all blend in and hardly be noticeable
The underneath of the floor was originally painted a Red oxide primer and will be repainted the same colour again
The A pillars will be finished in white paint but are predominantly covered by Stainless bright trim
I just some small repairs and touch ups to finish prior to primer.
Last edited by Paul B; 08-18-2018 at 09:29 PM.
Paul,
Bloody marvelous workmanship as usual.
So when are you going to move the steering wheel over or are you going to work for the Post Office and deliver mail ?
If you run out of things to do I have some projects here that need to be done properly and not hacked by someone my wife knows well !
I will also provide free transportation to Sonoma or Laguna Seca if we plan it accordingly.
Seriously, you do outstanding work and may it all come together easily for you from here.
Cheers,
Ken H

Beautiful work Paul - a really great job. This is one car that everyone will want to examine when it hits the track.
Thanks Ken & Mike,
The steering wheel will for sure stay on the left side. we would love to come over to your part of the world Ken at some point. But for now I will continue finishing this beast off. Will stay in touch.
Mike, That will be the nervous thing ... when everyone examines the car! No pressure to get it done right!
Cheers to all.
P
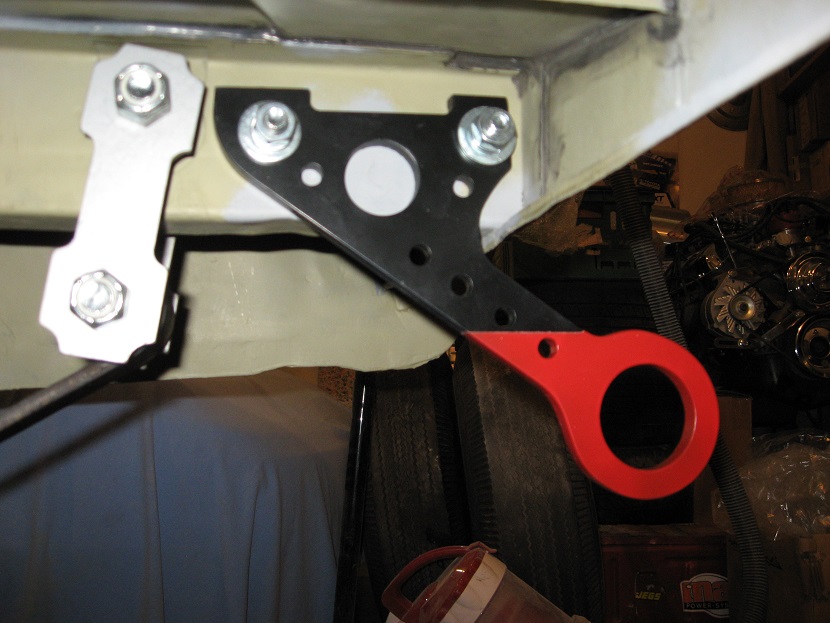
I replaced the hinge pins on the drivers door of the car, after 50+ years of door opening and closing the hinge pins and bushes wear out.
You will see the door will sag at the opposite end of the hinges, once it is opened, it is not uncommon for the door to drop 3mm to 6mm due to the wear. This makes the door hard to close as it does not line up correctly with the door striker plate. (this usually results in a "slam" to get it to close). The other issue is when the worn door is closed against the striker plate it will move up and down while driving, Not an ideal situation. I think this possibly may contribute to doors popping open in a collision.
So a worth while job to do
Most of the older Fords all have the same types of hinge pins and flange bushings.
This is a pic of the kit with the OEM hinge pin (rusty) on the side. There is 1 pin and 2 bushes required per hinge. The pin supplied needs to be cut to size and the end beveled/chamfered to match the OEM
First job to do is mark the top of both parts of the hinge. Only do 1 hinge at a time so not to mix up parts
Next, using the cut piece of pin or old pin, use this to press out the old pin, and then drive it out with a punch
Then you need to press out the old Bushes. First, knock the flange off 1 of the bushes (they are nickle copper) so it is fairly easy with a punch and hammer. then press out both bushes from the end the flange has been removed
Then lightly de-burr the pin & bushing flange surfaces on the hinge (using a light file or emery paper) clean all the hinge pin parts and surfaces. then moderately tap the new flange bushes into place using a flat hammer being careful not to bruise it.
Then cut and chamfer the new pin, clean it and grease it and the newly fitted flanges, then press it in place to the new assembly.
Job done
Last edited by Paul B; 05-25-2018 at 09:38 AM. Reason: correction
Back in the early 60s racing and NASCAR were really going ahead. Ford were racing the big heavy full sized fords all race prepped by Holman Moody. The 1960 Ford Starliner was really the first of the many Ford fastback styled cars. They were a very different design during that time, particularly in the rear wings. They were not every ones "cup of tea" but I think they are super cool, unique and different.
This clip is really an updated road car but will give you a bit of an idea on how they looked in the day.
The engine is a lowish output 390ci, but the 1960 cars were originally raced with 352ci and in 1961 a hot 390ci with 3 x 2 barrel carbs.
Last edited by Paul B; 05-29-2018 at 05:16 AM. Reason: correction
That is a very cool car, great period sound too. (interesting Nor Cal scenery)
I hope yours is driven like that.
Maybe Bruce, I always like to hear a couple of thousand more revs to put a smile on my dial.
But they are a very cool machines.
Interesting, in 1962 there was no fastback roof (but a 406ci big block) for the full sized Fords and then came the very cool 1963 Galaxie Fast back roof and the big 427. then all the good fun happened from there.
Last edited by Paul B; 06-12-2018 at 07:06 AM.
 Posting Permissions

 Reply With Quote