Bruce is correct. The FIA homologated cage which I had in a car of mine, and brand new SMP with papers, did not meet MSNZ in a number of places. Let's not restart the cage discussion
Bruce is correct. The FIA homologated cage which I had in a car of mine, and brand new SMP with papers, did not meet MSNZ in a number of places. Let's not restart the cage discussion
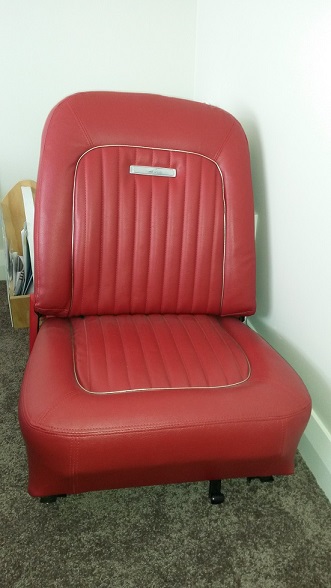
So I started rebuilding the seats, when the car was in the paint shop.The front buckets were absolutely gone, the usual broken springs, perished foam squabs, rotten hessian etc. broken seat slider mounts.
This is fairly typical of what you will see with the moulded foam squab when rebuilding seat, usually the seat base goes first and the back a bit later, new foam is now being remanufactured. Start by removing all side bolts and take the back off the base. Remove all the hog rings under the base (don't forget the hog rings that hold the piping down about 100mm on 3 sides) then remove the upholstery and foam.
Once you remove the foam, you will see the hessian (rotten) with 0.9mm spring wire at 25mm widths attached. These need rebuilding.
Next the broken springs will need replacing, frames repaired and welding any broken parts of the frame or spring retaining outers, with spring wire repairs, try to forge the weld with a hammer & dolly while its bright red hot and this will work much better with the spring wire... not ideal. the zig zag springs are best to replace, new ones they can be hand made at some companies.
It is important to realign the springs. assemble the frame after its stripped, and check the distance on the seat frame sides with the back lower hinge arms when the back is pushed forward. There should be clearance of about 15mm on each side.
Then clean, de-rust, and repaint the frames, and start reassembling in the order it came off, using new hog rings and hog ring pliers. the black hessian has been replaced with new 0.9mm spring wire, hog ring this into place, then put new felt around the same areas it came off, using the old stuff as patterns.
Mark the centre of the frame, foam squab & new upholstery front to back, Place the new foam squab on top of this, and fix centred into place.
Then centre the upholstery, the really hard part is re hog ringing the seat centre piping down on to the steel spring steel. The pull the covers over, check the centre and hog ring into place

Last edited by Paul B; 06-30-2017 at 11:09 AM. Reason: Spelling & typo
Continued:
The back seats are easier to do and the same principle as the bucket seats
Upholstery is not easy at all, so if you have not done it before then it may be better going to a Car trimmer
Last edited by Paul B; 02-17-2017 at 09:02 AM.
Thanks Guys, for sure that is happening, Have been taking good advise from all and many including MSNZ, I appreciate the help from all. . The FIA Seamless steel tube is not readily available in NZ . So it will be a MSNZ cage. But I am going to build a bolt in cage.
Once I finalise the design plan I will take it in to MSNZ for approval prior to the build.
I think the phrase here will be "measure twice and cut once"
Cheers
Paul
Last edited by Paul B; 03-27-2018 at 09:06 AM. Reason: Correction
I did the fitting of the engine bay, Oil cooler and remote AC oil filter, It was very hard to find the right oil cooler and the fit was tight but it ended up fine. I needed to make a bracket, that also acts as reinforcing and then cut the square cooling hole for the oil cooler. Originally the hole had a grating screwed on the front to protect the cooler from debris which was painted black so I made that also.
I am also looking for a left side top inlet, right side lower outlet Griffin radiator.
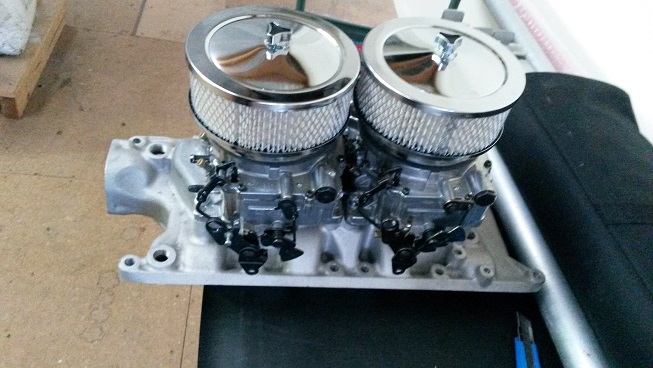
The twin 4 barrel manifold and carter carbs (2 x 500cfm!) were also difficult to get and expensive, but a must have. I personally think these engines were over carbed and would perform better with around 750cfm. They are easy to re-jet and good Jet kits are available.

Last edited by Paul B; 09-14-2017 at 10:11 AM. Reason: Correction
Hi Paul, I run a '64 Falcon Rallye Sprint in Pre-65 historic touring cars in Perth, Western Australia. I did a lot of research (as you have done) back in 1989 when my car was first built. I collected a lot of material (papers and photos) on a visit to Ford at Dearborn, MI and from Lee Holman. I also collected a lot of original Monte Carlo material from Alan Mann on a visit to the UK; together with homologation papers from the RAC-MSA. My car is a full-on racer and built in accordance with the FIA homologation (#1250) with a CAMS regulatory overlay. I have all-over fibreglass panels; i.e. all hung panels and bumpers. I also have a full set of moulds if you ever need some assistance -- a bit late with that offer perhaps? Alan Mann gave me a lot of info in respect of the cars that were left after the 1964 Monte Carlo Rallye -- i.e. registration numbers, race numbers, VINs, etc. If I can ever be of assistance in respect of background information, don't hesitate to ask.
Thanks for your post! I would be keen to see some pics of your car, you could post them on the "Falcon Sprint" thread, It would be great to see and hear about what you are doing in Perth! You can also Private Message me through this site. Do you have any videos of your car racing?
Also very kind offer to share info and that also goes for me. I am more than happy to helps and share, mainly to preserve the history for all to read and to keep it alive.
I am most interested in the 1964 engineering and design build of the cars. I am also particularly interested in Holman & Moody body/Chassis modifications.
Thanks for your offer of the Fiberglass, I am almost finished with that smelly toxic stuff, but very happy with the result.
Cheers
Paul
Hi Paul,
i tried sending you some photos, but the site requires a particular size (2000 x 2000) and mine are all different. I'm not much good at this blogging business! There are several of my in-car racing videos on YouTube under the category '1964 Falcon Rallye Sprint' -- let me know if you have trouble finding them?
My understanding is that all the performance mods to the Monte Carlo cars were done by H&M, then the cars were sent to the UK for Alan Mann to mod them for rallying. So, H&M did the W289 switch, T10 gearbox, Lincoln front spindles, KH big 4-spots and discs, Galaxie rear drums, 9" diff, 15" wheels, etc.
I'm happy to send you a copy of Alan Mann's notes of the status of all the cars after the Monte Carlo Rally if you can send me an email link -- mine is bmeeke@meekeconsulting.com.au
Its a large file size (7Mb) and I've got some other interesting stuff from my meetings with Alan Mann. I've also recently sent a lot of stuff to Mike Matune (a noted automotive historian and author) in the US. He is doing some work for Lee Holman at present and contacted me for some of the information I have collected.
Hi Bill, its great to have you on here. Thanks for posting. Please feel free to email me any photos that need resizing and uploading to the site. I can do them: theroaringseason@gmail.com
Paul,
This is absolutely brilliant what you are doing and sharing with us. I have restoration books that are no where as good as what you are providing.
So I just want to thank you so much and truly appreciate your efforts and time and the before and after photos are a testimony of a job very well done.
Cheers,
Ken Hyndman
Hi Ken
Thank you for your kind words. I am really enjoying the build immensely and its great to get some awesome feedback. I had a lot of help with parts from Al Aiello from the Falcon club in USA. Al was fantastic in locating some difficult parts for me. He is really a great guy.
Kind regards
Paul
Always liked these cars and it is great to see one being prepared for the HMC class. The Falcon Sprint that Jim Richards races in Australia is a really neat looking machine. Your explanations and photos of the work and how to go about it are really appreciated and I am sure will provide help to many car builders.
Keep the photos coming and keep us up to date with progress.
I will add it to my list of HMC / HSC cars that are currently racing or are being built up.
The 289 is a great small block, the one issue is the breathing of the heads and smallish valve sizes.
The engine would really benefit exhaust porting and some mild inlet porting and port matching, Larger valves and some chamber de-shrouding to improve flow.
The other issue is the conrod bolts are fairly small as they were with many engines of this vintage and a new set of forged H or I beam cap screw rods would be a great asset.
The oiling systems always need work, to improve oil pressure and getting good oil pressure the back of the block #4 and #8 cylinders.
I started the engine build, this will be built to 1964 Monte Carlo Rallye spec' and originally built at Holman Moody, The 289 engine they developed (using a K 289 Hi-po engine as a base) had much more power than the factory K series engine. It had Carter 2 x 4 bbl Carburetors, Modified heads, larger valves, 12:1 compression pistons, modified C2FF-12127 Distributor (very rare twin point with blocked vacuum advance, used on some R Cobras). I believe they used the original K series cam shaft but with different valve train components, The engine also had a remote oil cooler and winged 7 ltr sump.
I just couldn't hold back, I had to see what it would look like built. So I loosely fitted it all together to see how it will look.
I will finish the build when the car goes in for the roll cage.
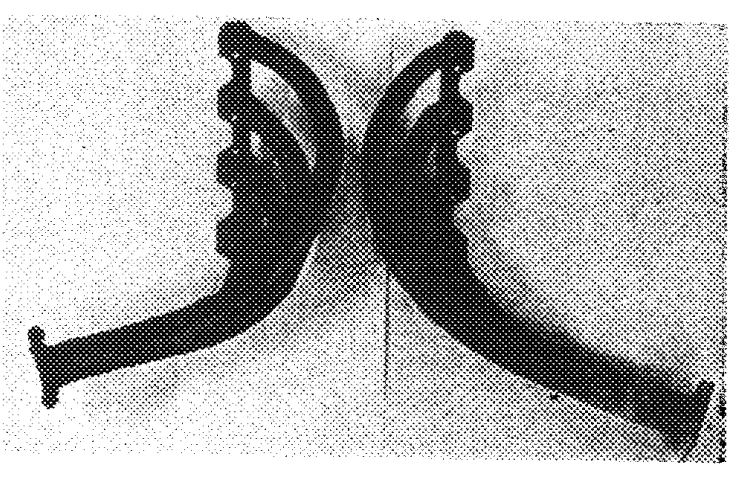
The cars were actually raced with factory cast Iron headers (thanks to Bill Meek for taking the time to go to the UK and interview Alan Mann to find out the facts). The "on file" FIA homologation #1250 showed some upswept headers, also optioned for cast iron.

Last edited by Paul B; 03-15-2018 at 08:14 AM.
Our next meeting is HRC Legends at Hampton Downs at the end of March. You are welcome to come and join us and it is not all racing but also a lot of social chatting and meeting people. I will be going and you are welcome to come along. Cheers, Bruce
Thanks Bruce,
That sounds great. I see on the HRC news letter 25 and 26 March.
I might drive up on Friday.
Cheers
I like Bucklers and a lot of forgotten fiberglass for that fact, there have been so many interesting cars made over the years.
I will have some more build posts coming after the car gets the roll cage in. Enjoy that shady Tree!
Cheers for your reply
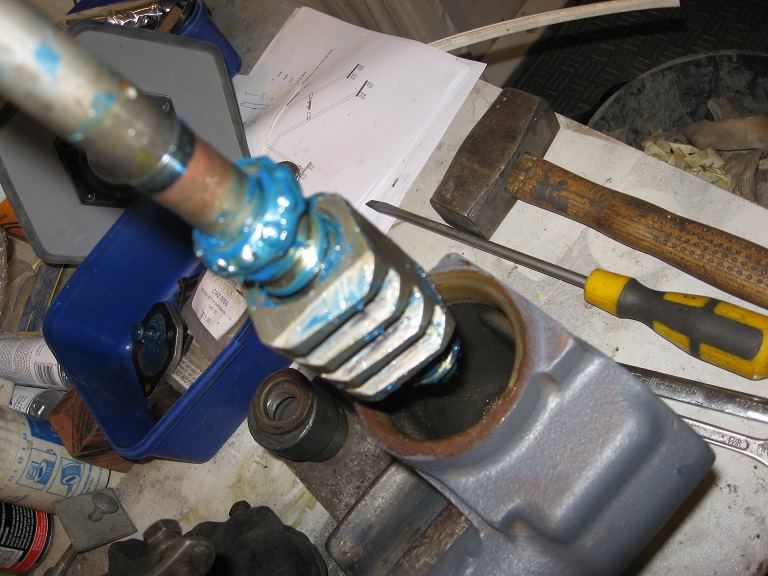
I rebuilt the steering box, they all need rebuilding after 50 years. You never know what you will find until you open it up. First remove the Pitman arm with a pitman arm puller tool. Hard to remove, keep a lot of pressure on while light side taps and it will pop off. Then loosen the sector shaft nut and turn the worm screw in a couple of easy turns, never force any thing on a steering box. Loosen the 3 bolts that hold the sector shaft plate, slide the plate toward the oil filler. it will disengage from the sector shaft. Then you can pull out the sector shaft, be careful of the bearing surfaces down the shaft. Check the gears for wear and damage. looking down the shaft hole you will see 2 needle roller bearing carriers and at the bottom an oil seal. I usually replace these all (1-1/8" shaft on the sprint, Mustangs are 1 inch), they tap out very easily be careful of the internal surfaces. you can tap or press them back in using a large socket or the like.
Use an impact screwdriver & hammer to loosen the large ring on the steering shaft, the unscrew the housing cap. you can then remove the whole shaft with the worm intact. inspect the upper and lower bearing races and inserts. More than likely the Seat inserts will be pitted and there may be damage to the bearing race, replace these, again they tap out fairly easily.
If you choose to remove all the ball bearings from the worm shaft...! there are 62 bearings and it is tricky to get back together. You must load the centre of the worm and don't move it while reloading it. Check all the worm surfaces for pitting. Once it is all degreased, washed, CRC or WD40 and dried clean you can reassemble with some moly grease on all the bearing surfaces. I also grease pack the sector shaft bearings down to the seal. Center the worm on the steering shaft, finger tighten all the adjuster rings and worm screw with lock nut so there is zero lash, but no drag. once the steering box is in you will need to set preload, You need a lb scale to pull the steering wheel it should take about (Ford manual says Maximum 4.5 Ft lbs) 3-4lb to turn the steering wheel (12inches from the center of the wheel) use the sector shaft screw to tighten/loosen in VERY SMALL INCREMENTS or you will damage the steering box. Also check end play at the end of the pitman arm, you need zero lash again, if it has some movement, Recheck Preload again. Screw the sector shaft adjuster screw inwards to tighten, it is best to back it off so you feel loose lash then slowly tighten so only just removes all lash, caution with this as over adjustment tightening will cause binding of the sector shaft and worm gear, then damage to the gears with excessive wear.
These are the old parts that were replaced
I have the parts now that Holman moody used to quicken the steering from 19:1 to 16:1
Plus a new sector shaft, a big thanks to Dale!
Removing the Pitman arm bolt, needs a lot of leverage, and good hold on pitman arm
Removing pitman arm, a lot of pressure and patients
Reassembly

Last edited by Paul B; 06-09-2020 at 09:05 AM.
Nice Paul, I was thinking about pulling mine down but have taken the play out of it. Like your work.
Stuart McC
Hi Stuart,
Thanks for your reply, When taking the play out of the sector shaft/ball nut, using the worm screw& lock nut on the top of the steering box. there need to be some end play from the base of the worm screw inside the box, to the sector shaft so you don't have binding and premature wear of your Steering box. Refer to factory manual sector shaft end play. Hope this helps.
Cheers Paul