Page 4 of 29 FirstFirst ... 2345614 ... LastLast
Results 61 to 80 of 563

Thread: BUILD THREAD For 1964 Falcon Sprint to Monte Carlo Rallye FIA spec'

  1. #61
    Semi-Pro Racer Spgeti's Avatar
    Join Date
    Sep 2012
    Location
    Feilding NZ
    Posts
    813
    Quote Originally Posted by Paul B View Post
    Thanks guys,
    I have an old school primary cut off inside the car, the outside cut off is secondary, but I don't dig the plastic.
    The pull cable sounds cool ... did you see the rope cable on the floor trapdoor on the H-M Galaxie ... Rope activated! coolness

    I will check out ebay, thanks for the link. Do you know if the Pollak switches are waterproof?e

    Cheers
    Hi Paul, I see on their website it states that the switches are suitable for marine use and they are moister proof.....does not mean they are waterproof.

  2. #62
    Semi-Pro Racer Paul B's Avatar
    Join Date
    Feb 2017
    Location
    Wellington, NZ
    Posts
    649
    Quote Originally Posted by Spgeti View Post
    Hi Paul, I see on their website it states that the switches are suitable for marine use and they are moister proof.....does not mean they are waterproof.
    Yes that's right, I emailed the distributor and he replied saying the Pollack switches are not waterproof.
    I have a couple of ideas that could do it, If they work I will post them up.

    Cheers

  3. #63
    Quote Originally Posted by Paul B View Post
    Most of the FEs I had were in need of rebuilds, some I built. It was a long time ago, they were all sold off in 1989
    Some that I had:
    406 old race engine with x bolt mains adjustable rockers teflon gudgen buttons, This was a blown engine I bought
    428 SCJ that I rebuilt with 2 x 4bbl lowriser (that was a beast of an engine) (Think it went to Auckland into a BB 67-68 Mustang)
    427 top oiler x bolt mains, very nicely finished block, 1964 had Shelby alumin' sidewinder inlet (this was in wellington last I Knew)
    I built a 410ci with 427 heads big cam 11:1 comp, factory 427 twin point - this thing had unbelievable power. (I sold this to a guy in Levin)
    390s etc
    I would like to build an early 60s FE big block Historic, I particularly like the 1957 ford custom 2 dr
    Attachment 42970
    On another tangent... It would also be very cool to do a build on the Robbie Francevic's 427 Fairlane
    Attachment 42971
    Neat engines Paul. As well as 352's and 390's I had a 65 427 top oiler , lemans rods, 428 CJ heads,
    genuine Ford tunnel wedge twin four intake C8AX.
    Just wondering did you seam weld any part of the engine bay ? Do the rules allow it.

  4. #64
    Semi-Pro Racer Paul B's Avatar
    Join Date
    Feb 2017
    Location
    Wellington, NZ
    Posts
    649
    I have not seam welded anything at the moment, The rules on reinforcing etc will need to followed. I am wanting to keep this build as period correct as possible in everyway to 1964,5 & 6 when these were raced up to Group2 & 5 I think.
    It will be really interesting racing this car as close to exact build with no "new add ons" to make it better than it was.
    I like The FEs very much, that's a rare engine you had, is it still about?
    I will build another car after this with a FE.
    Cheers

  5. #65
    Semi-Pro Racer Paul B's Avatar
    Join Date
    Feb 2017
    Location
    Wellington, NZ
    Posts
    649
    I have done a heap of research on body reinforcing and welding that may have been done at Holman Moody and... I can't see in any period pictures or anywhere of any reinforcing apart from when the cars were built to group 5 and there was extra reinforcing added around the rear spring hanger chassis holes as some cracking occurred.... after 1964 and then 2 years of full on racing, they went to wider rims, more traction, more stress on the suspension, this is likely what caused the stress cracks.
    Of course safety being what it wasn't in 1964 there were no roll cages in the 64' Monte Carlo Falcons.
    The Falcons did not have the upper Monte Carlo rally bar above the engine, only mustangs were fitted with these.
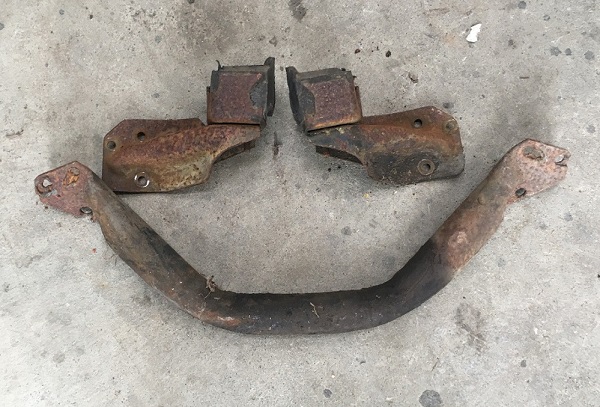
    The MCR falcons had a lower suspension brace bar likely H-M fabrication that fitted under the sump and attached to the engine bracket bolts. A very tight fit. Also had the export brace fitted to the upper front suspension towers.
    Both 63 & 64 had long aluminium skid plates under the of the front engine and these were bolted to the front chassis and engine brace. Also in rear below the fuel tank there was another skid plate
    Below is the 6 cylinder lower brace bar, this does not fit with the V8 engine mount configuration and quick ratio steering.
    Name:  Suspension brace.jpg
Views: 1564
Size:  117.4 KB
    Last edited by Paul B; 09-14-2017 at 10:26 AM. Reason: correction

  6. #66
    Semi-Pro Racer Paul B's Avatar
    Join Date
    Feb 2017
    Location
    Wellington, NZ
    Posts
    649
    Here is an interesting link on Fords 427 SOHC engine, a fantastic piece of engineering at the time. 600hp straight out of the crate was the talk back then
    https://macsmotorcitygarage.com/camm...d-427-sohc-v8/

    Yes, the manifolds are red hot in this picture!, I believe that this was the test engine
    Name:  427art3.jpg
Views: 1331
Size:  10.3 KB

    That is a lot of timing chain
    Name:  427sohc-chains.jpg
Views: 1373
Size:  17.8 KB

    I think that is 1 piece of VERY COOL engineering. They had tunnel port heads
    Last edited by Paul B; 05-21-2019 at 07:37 AM.

  7. #67
    Semi-Pro Racer Paul B's Avatar
    Join Date
    Feb 2017
    Location
    Wellington, NZ
    Posts
    649
    I had some help with the original steel rims and found a set from Neil, he has some great TBirds, including a factory 427 Tasca Bird!. These are the correct Kelsey Hays 5.5 inch rims.
    Name:  KH rims.JPG
Views: 1332
Size:  77.0 KB

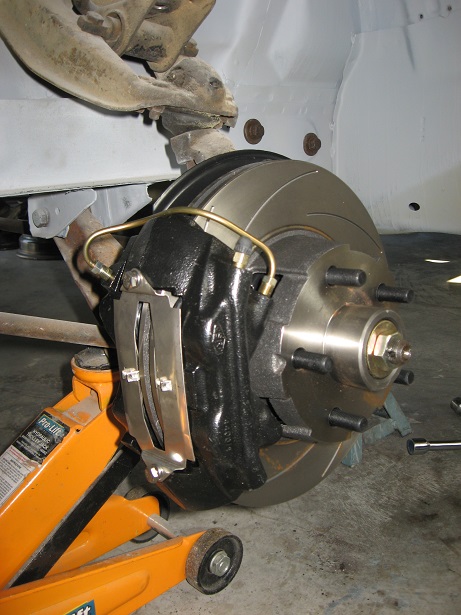
    I fitted the rims up together with the Kelsey hays 4 pot discs and a very nice fit.
    Name:  IMG_0870.JPG
Views: 1278
Size:  104.0 KB
    The steel brake shoe access panel will be fitted with a split pin removal, very quick to change shoes
    Name:  IMG_0872.JPG
Views: 1335
Size:  110.6 KB
    Last edited by Paul B; 04-22-2017 at 08:57 AM.

  8. #68
    Semi-Pro Racer Paul B's Avatar
    Join Date
    Feb 2017
    Location
    Wellington, NZ
    Posts
    649
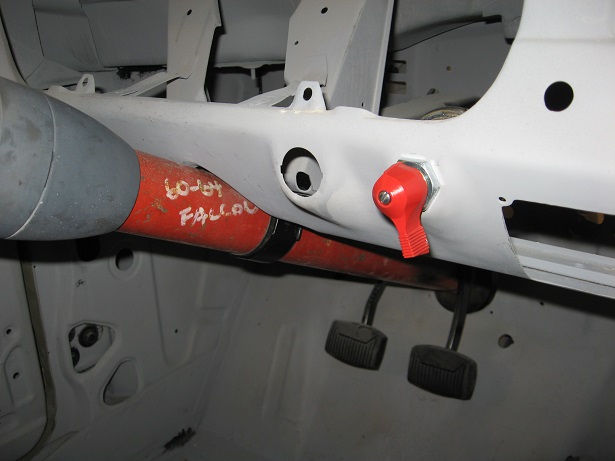
    I also fitted the interior primary cut off switch and it fit very nicely where the cigarette lighter was.
    In the background is the manual transmission steering column
    Name:  IMG_0862.JPG
Views: 1300
Size:  68.1 KB

  9. #69
    Semi-Pro Racer Paul B's Avatar
    Join Date
    Feb 2017
    Location
    Wellington, NZ
    Posts
    649
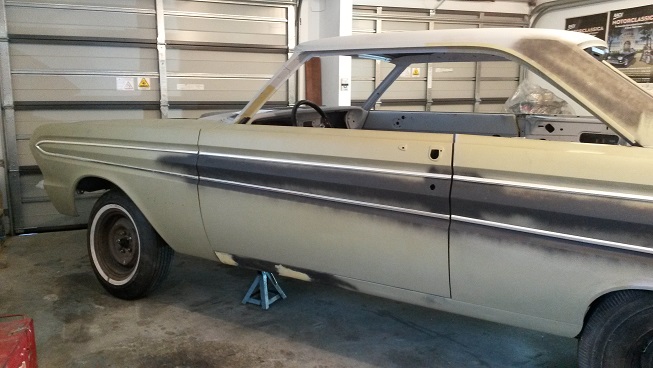
    Got back to longboard sanding the body down, to do this all the panels need to be fitted back up as perfect fit. Then long board sand the body and also across the fitted panel gaps to get the best finish.
    I fitted up the bright work trim also to ensure all is lining up correctly. Too late to change anything after its painted!
    Name:  20161009_184849.jpg
Views: 1319
Size:  62.7 KB
    Name:  20161009_184938.jpg
Views: 1355
Size:  91.7 KB

  10. #70
    Semi-Pro Racer Paul B's Avatar
    Join Date
    Feb 2017
    Location
    Wellington, NZ
    Posts
    649
    There is only so much longboard sanding you can do when you would just like to play with some other parts... so I got distracted and continued engineering the final fit for the brakes, The Kelsey Hays rims gave much needed clearance for the Callipers and some room to breath too
    Name:  IMG_0876.JPG
Views: 1261
Size:  129.0 KB
    The spindles will get a nice restoration soon.. after the fitting
    The good thing about this build is there is so much room to fit brake cooling ducts it will be quite easy to do...That's later

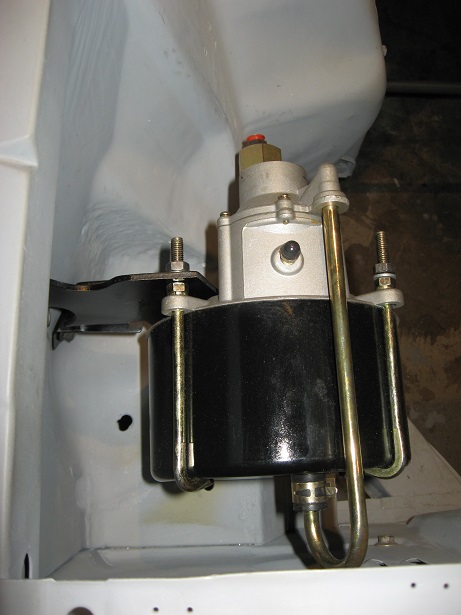
    I continued with the original in line brake booster and fitted that up, I needed to fabricate an outer bracket as best I could from original photos and fitted this.
    Name:  IMG_0882.JPG
Views: 1271
Size:  79.4 KB
    Name:  IMG_0883.JPG
Views: 1229
Size:  76.9 KB
    Last edited by Paul B; 06-06-2017 at 09:44 AM. Reason: typo

  11. #71
    Nice work Paul, That will be a very impressive car.

    Thanks for the photos and updates.

    Bruce.

  12. #72
    Semi-Pro Racer Paul B's Avatar
    Join Date
    Feb 2017
    Location
    Wellington, NZ
    Posts
    649
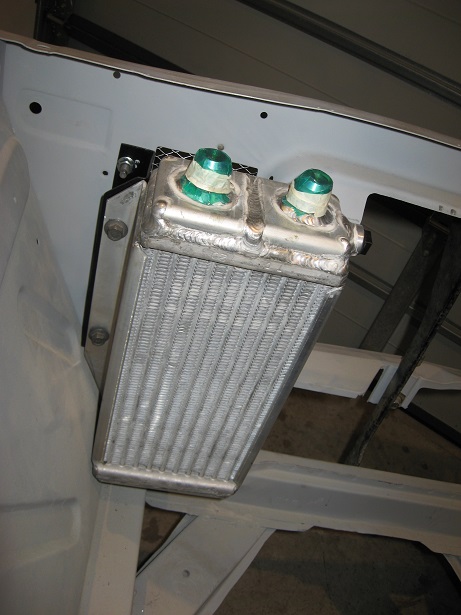
    I went back over the oil cooler to check the fit and measure up for the radiator
    I was lucky enough to find an original photo of the black aluminium mesh (debris protection) for the oil cooler. It looked a bit crude but none the less same as original so that's how I built it
    Name:  IMG_0888.JPG
Views: 1187
Size:  74.1 KB
    I need to also fabricate a new bracket to fit the Oil cooler
    Name:  IMG_0889.JPG
Views: 1225
Size:  80.6 KB
    Name:  IMG_0890.JPG
Views: 1236
Size:  87.4 KB
    Last edited by Paul B; 04-26-2017 at 10:09 AM.

  13. #73
    Semi-Pro Racer Paul B's Avatar
    Join Date
    Feb 2017
    Location
    Wellington, NZ
    Posts
    649
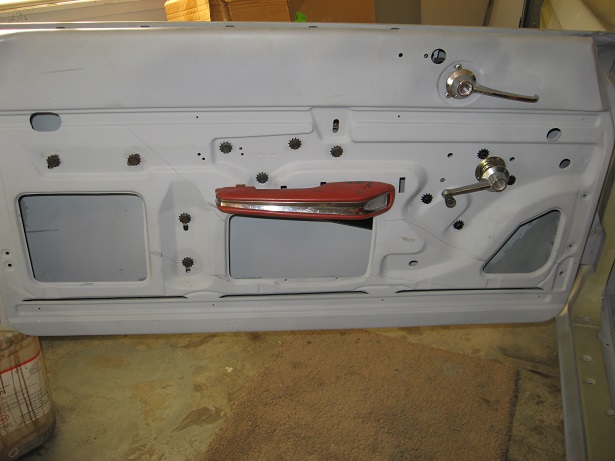
    I moved on with the final pre-fit for the roll cage, I need to fit up all of the window winders, door handles and seats and the handbrake. Very easy to forget to pre-fit that part. It is a fairly tight fit but all fits snug.
    Name:  IMG_0860.JPG
Views: 1236
Size:  98.2 KB
    Name:  IMG_0867.JPG
Views: 1235
Size:  80.5 KB

  14. #74
    Semi-Pro Racer Paul B's Avatar
    Join Date
    Feb 2017
    Location
    Wellington, NZ
    Posts
    649
    Quote Originally Posted by Bruce302 View Post
    Nice work Paul, That will be a very impressive car.

    Thanks for the photos and updates.

    Bruce.
    Thanks Bruce, Looking forward to the day I getting it on to Hampton Downs!
    Cheers

  15. #75
    Semi-Pro Racer Paul B's Avatar
    Join Date
    Feb 2017
    Location
    Wellington, NZ
    Posts
    649
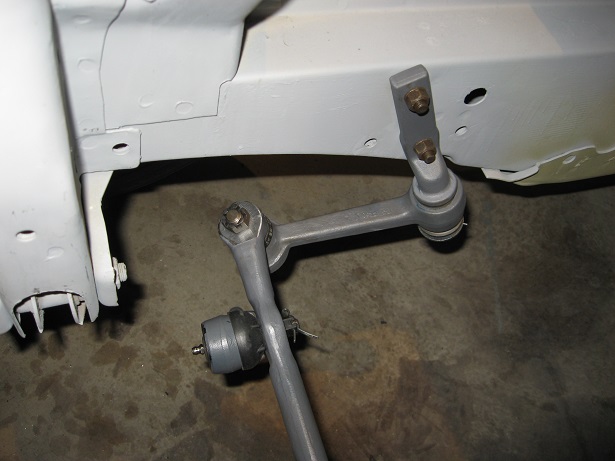
    The long weekends over Easter were great to get a lot of jobs done. I also pre- fitted the quick ratio steering. and need to final check clearances for the lower tower support bar
    Name:  IMG_0886.JPG
Views: 1275
Size:  79.4 KB
    The original H-M built FIA car was 3.25 turns from lock to lock. Very good steering for 1964
    Name:  IMG_0887.JPG
Views: 1246
Size:  76.7 KB
    Last edited by Paul B; 04-20-2018 at 09:51 AM.

  16. #76
    I think I've run out of superlatives for this build.

  17. #77
    Semi-Pro Racer Spgeti's Avatar
    Join Date
    Sep 2012
    Location
    Feilding NZ
    Posts
    813
    Quote Originally Posted by Steve Holmes View Post
    I think I've run out of superlatives for this build.
    Yes I agree Steve. It is what we have been telling the guys in HMC/HSC, research, research before building.

  18. #78
    Semi-Pro Racer kiwi285's Avatar
    Join Date
    Apr 2011
    Location
    Papamoa Beach
    Posts
    956
    This is turning into a "How to' for building a HMC specification car. I am looking forward to meeting and having a chat - maybe on 20th May at HD. Magnificent job Paul.

  19. #79
    Semi-Pro Racer Spgeti's Avatar
    Join Date
    Sep 2012
    Location
    Feilding NZ
    Posts
    813
    Quote Originally Posted by kiwi285 View Post
    This is turning into a "How to' for building a HMC specification car. I am looking forward to meeting and having a chat - maybe on 20th May at HD. Magnificent job Paul.
    It is actually a FIA Appendix K build Mike. Accuracy is very important in these builds and is far more period correct than the HMC spec which is based on Schedule T&C.

  20. #80
    Semi-Pro Racer Paul B's Avatar
    Join Date
    Feb 2017
    Location
    Wellington, NZ
    Posts
    649
    Quote Originally Posted by Spgeti View Post
    It is actually a FIA Appendix K build Mike. Accuracy is very important in these builds and is far more period correct than the HMC spec which is based on Schedule T&C.
    Thanks Bruce, Mike & Steve,
    It has been super interesting researching the build and I think it makes it more satisfying for me having the correct parts in the correct place.
    I had a big glitch with the diff, as it was a HD Lincoln Versailles, so I after a lot of searching I found a correct early Galaxie housing, I have the LSDiff head already so the diff build is next to follow.
    Still waiting for the roll cage fit.
    It would be great to catch up on 20th - working on it!
    Cheers to all

Posting Permissions

  • You may not post new threads
  • You may not post replies
  • You may not post attachments
  • You may not edit your posts
  •