
This is an early view of how H-M set up the diffs, mainly for NASCAR, check out the oil cooling pump drive I think the pulley was fordson tractor.
Also the rear brake air ducts... and lowering blocks


This is an early view of how H-M set up the diffs, mainly for NASCAR, check out the oil cooling pump drive I think the pulley was fordson tractor.
Also the rear brake air ducts... and lowering blocks
Last edited by Paul B; 06-26-2017 at 09:25 AM. Reason: correction
I have decided not to use the steel doors, fenders, hood & Trunk
but instead opted to use all fiberglass panels as the Graham Hill car ran in the 1964 Monte Carlo Rallye (as did all 8 FIA cars entered)
I now have the Fiberglass hood, front fenders, doors and boot lid. I will be fitting up the panels over the next month and will post some more progress pic's soon.
The panels need a lot of work and will slow progress of the build to complete them and fit them correctly.
the doors will need functioning roll up windows. Most of the fiber panels will need reinforcing and many hours of extra work to get them to fit as they were in the day to be period correct. And then prep it all for paint.
Bodywork is by far the longest part of the build but so important to get it all done correctly as it will be all seen for a long time. So having a finished functional job that you can be proud of is the goal
Last edited by Paul B; 05-30-2018 at 09:13 PM. Reason: Update
Myself and Tony Roberts spent a few hours with Paul and his lovely wife Bibi couple of Saturdays ago, they made us most welcome and enjoy looking at Pauls Falcon build, his attention to detail is assume, we had much discussion about his build, FIA schedule K, Homologation papers and the difference between this, T&C and old NZ historic Saloons.
Paul has committed to building his Falcon to FIA and will obtain the correct HTP(Historic Technical Passport) as used in GB and Europe, with the help of the MSNZ Historic and Classic commission. I would one day luv to see a proper FIA schedule K only class for these old Saloons as it appears more are coming, but at least in the meantime HMC and HSC gives them somewhere to race. Dale Mathers
Last edited by Kiwiboss; 06-05-2017 at 02:46 AM.
Thanks Dale and Tony for taking the time to come by. It was our pleasure to host you both and talk old cars with like minded people.
Thanks also to yourself and Tony for the support and everyone else that has contributed positive support. I have found it all very motivating.
Cheers to all.
Paul
Last edited by Paul B; 06-04-2017 at 05:15 AM. Reason: typo

Where did you source the panels from Paul?Originally Posted by Paul B

I'll send you an email
Cheers
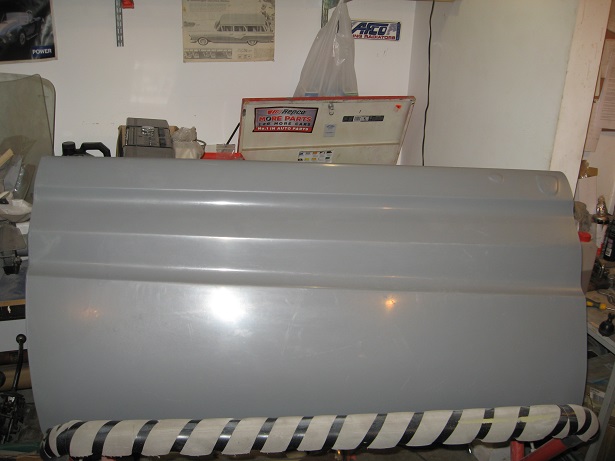
Now with all the lightweight fibreglass Hood, Doors, front fenders and trunk lid in the work shop, the big job of fitting and finishing it all begins. Fibreglass panels need an awful lot of work to fit correctly and usually some extra fibre glassing is needed to get it right. also some manufacturers use a type of rubberised type of mold release which is actually a type of alcohol based PVA and must be completely removed all over as a part of the prep work.
Then fitment begins, I have elected to use all of the OEM hinges & Bolts for , Hood, doors & Trunk lid also OEM bolts and fitment for Front fenders to meet the exact mounting placement as original.
As far as researching the Fibre panels for 1964 they were exact copies of the OEM steel parts. So I will continue down that path.
The finish of these parts was pretty good.
The Trunk lid was made almost identical to steel top and inner panel too
The hood and front fender, pre fit much work to do here
The doors are nicely made skins but inner frame is too flimsy and will need work
Last edited by Paul B; 05-30-2018 at 09:16 PM. Reason: typo
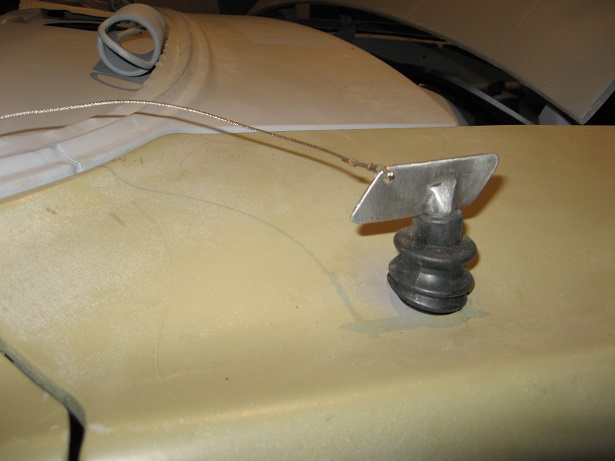
On page 3, post #51 the external cut off switch is posted and the plastic modern look just did not cut it for me. So I fabricated a new steel key and a rubber waterproof grommet and I think it looks much more period. I will need to get some red colour on this too.
Thats a really nice kit Paul.
Thanks Steve, the freight from the states was a killer but completely worth it.
I started fitting the fiberglass panels, the doors need a lot of work to mount the door handles, locks, latchs and hinges. As I will be using OEM parts to fit the fiber panels I needed to fabricate some door inside hinge mounts and reinforcing. I have modeled these on the exact parts that are in the OEM steel doors. These new steel parts will be fiberglass into the fiber doors. The 4 way adjustable part will be also fitted prior to fiberglass.
The top steel hinge panels for each door also provide reinforcing for the quarter windows which is much needed for these particular fiber doors. The lower steel protrusion On the (top pieces in picture) mounting point will also add to the strength of the mounting of lower quarter window mount bolt.
For fitting the handles I made a pattern using 2 reference points from the steel doors then fitted the pattern to the fibre panels for cutting out the door handle holes and lock holes
Then I cut out the holes using mainly a drill and grinding tip, because the fibre is a bit thicker around the handle area a small amount of extra material must be removed to fit the door handle successfully
The fibre doors will need a lot of tidy up work around the edges and seams after the initial fit. They are by far the most amount of work to fit correctly as they are simply fibre blanks and every mount hole must be created using reference patterns. I have elected to use wind up windows with 4.5mm Lexan replacing the glass. The OEM glass is too heavy for the fibre door structure.
The addition of the steel hinge reinforcing adds extra support structure to the door and I also wanted it for safety with these lightweight parts.
Last edited by Paul B; 12-25-2017 at 11:26 PM. Reason: Correction & addition
Outstanding work Paul, I can't wait to see this car in the flesh.
Thanks Steve,
I have a lot more time now to work on it so things will go a little quicker now.
Cheers

Looking really good Paul. Yes a huge amount of work to get the doors fitted out. We have a contact for Lexan if you have not got that sorted.
Cheers
Thanks Bruce
I have not got the Lexan sorted yet so a contact would be great, thanks very much for the prompt!. I think its 4.5mm for side and rear windows.
I have spent nearly 30 hours on the doors so far, estimate another 10-15 hours to finish fitting. Then the clean up and panel work, prime and paint prep.
Cheers
Last edited by Paul B; 07-04-2017 at 09:07 AM.
Fitting the fibre glass doors (once all the handles, latches and hinges are done) is not your usual job of getting the gaps right.
There will be a variation between the outside and inside moulds and where they are bonded together.
This in turn affects the rubber seal and door gaps.
With Fibre doors they need to be fitted with the door rubbers on (once you have done a prefit of the door shell, marked & drilled the hinge holes) and fitted from the inside first to ensure the rubber is fitting correctly all around the door. First I check the inside gaps are all even and factory. Then to test the fit I close the door with a sheet of paper in between, pull it to check tension. I do this all the way around. This will check the inside seal & weather tightness is correct.
Then it is down to gapping the door for the correct fit, sometimes this may involve extending some fibreglass to some edges to correct the gap or sanding some fiberglass to get the gaps right.
..... its a mission!
Last edited by Paul B; 07-06-2017 at 09:39 AM. Reason: Correction
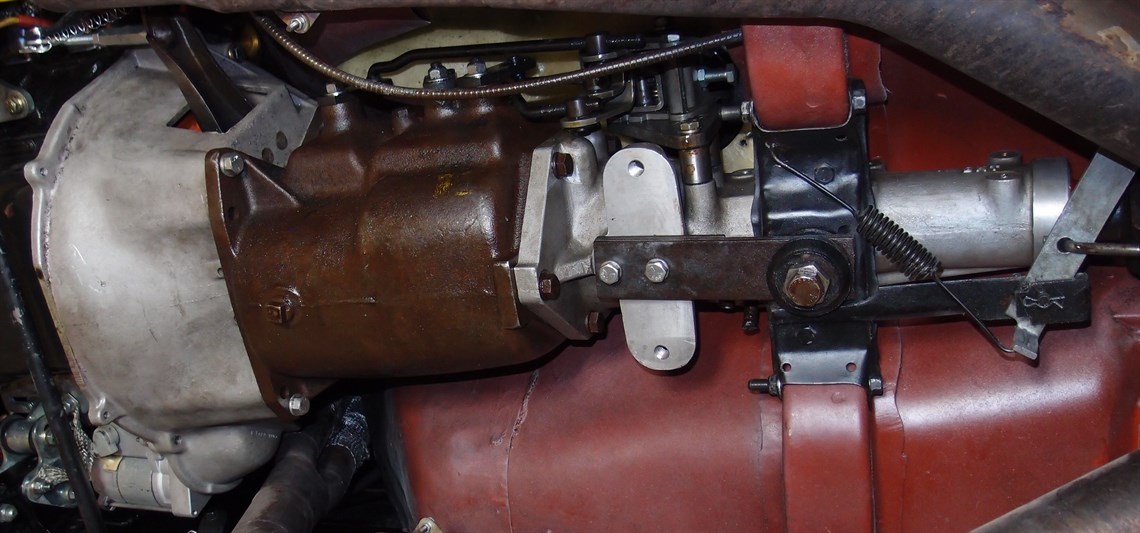
This is Lars Esselius's Falcon Sprint from Sweden, Lars is a specialist in building these cars.
I think this is his second sprint built
This car ran 2.03 around Sandfort in The Netherlands
The engine is 398bhp 289, very healthy for a flat tappet engine
The gearbox on this car is a toploader with alloy tail shaft & straight cut gears and not a T10 which was original
Last edited by Paul B; 08-23-2017 at 10:42 AM.
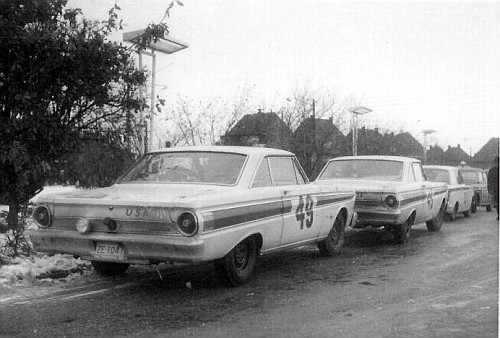
Graham Hill and Ian Walker teamed up in car 201. Graham Hills car carried more interior trim than some of the other cars. He had a few "offs" during the race. One story was he pulled off part of the left front fiberglass fender after they tried to pull out the front of the car with a rope tied to a tree after an "off" on part of a stage during the Monte Carlo Rallye.
This photo was taken at the end of the race, Ian Walker was standing so you could not see the damage of the front left fender which happened in a later stage.
The below picture was actually the Media car but carried Graham Hill's race number, a clone for writer reviews
If you look at the rear suspension front spring mount, this was much lower than stock, this was a reinforced plate front spring hanger and extra half spring fitted to minimise axle tramp.
Last edited by Paul B; 08-18-2018 at 05:45 AM. Reason: updated image
I finally got to meet Paul last week and take a look at his Falcon Sprint build. As well as being a bloody nice guy, Paul is doing an incredible job with this car. This is going to set new standards for period correct historic tin top race cars in New Zealand. The attention to detail is just amazing, and everything is very well researched and thought out. Can't wait to see the finished product.
Thanks for your kind words Steve. It was great to meet up and "chew the auto grease". I really enjoyed having you visit.
I am still enjoying the build very much. I am chomping at the bit to get this finished, just the fibreglass and roll cage slowing me down, then its off to paint.
Hopefully will get up to HMC HSC next meet, I think in October.
Cheers
 Posting Permissions

 Reply With Quote