-
1965 Australian Grand Prix
I have been on a quest to know everything about this race for decades...
It was the best race I ever saw, truly magnificent as McLaren, Brabham, Phil Hill, Jim Clark and Graham Hill battled it out. However, with such a tussle going on between these champions, much of the also-ran action got missed. Race reports got skimpy as their space was absorbed by the need to cover a race I now know to have been Phil Hill's greatest drive.
Yes, for years I said, "Phil Hill made that race come alive!" But when I learned that he described it as his greatest race ever I looked back over it and recognised that it was.
In my pursuit of information about the event I've spoken to many, many people. Lyn Archer, for instance, gave me some good information about Rocky Tresise during practice and prior to the race, while Jon Davison disclosed other aspects of the events surrounding the fatal crash and its aftermath. Sadie D'Abrera added yet more to this, as did Peter Bakalor.
Just look at this photo of the grid, published in the book, The Official 50-Race History of the Australian Grand Prix:
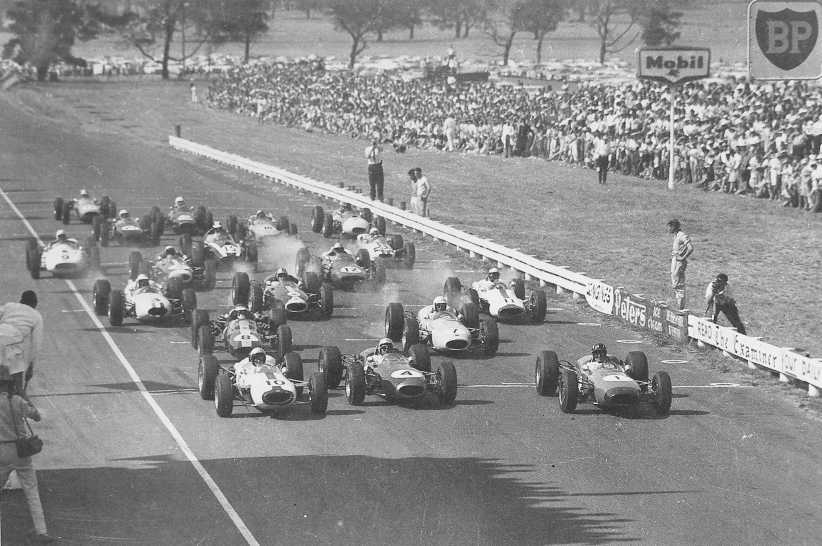
The start. A host of Champions in this photo - pole position is Bruce McLaren, Jack Brabham and Graham Hill complete the front row; The second row is Jim Clark and Frank Gardner, third row is Frank Matich, Bib Stillwell and Phil Hill, fourth row Jim Palmer and Rocky Tresise, fifth row John McDonald, Jack Hobden, Bob Jane, sixth row Roly Levis and Mel McEwin, back row Glyn Scott, Lyn Archer and Kerry Grant. And the cinematographer on the right, with his lens trained on Hill's tacho, is none other than Peter Hopwood.
And while just one lap later pandemonium would erupt at the point just past the pits where the track narrowed, the fabulous race would simply unfold before our eyes in the following 61 minutes. Just a little over an hour with an average speed of 114.72mph. The lap record would drop time after time, McLaren, Brabham and Phil Hill taking turns to lower it until it finally rested with Brabham at 117.04mph. Flying eighth times on the quickest part of the circuit recorded McLaren as the fastest with a pass at 169mph.
The Viaduct would echo to the bark of the Coventry-Climax fours, Campbell McLaren's voice would report the race progress at Longford Corner, opposite the pub, the transmissions would take a hammering over the railway level crossing just down Tannery Straight, a sight never before (or since) seen would unfold over the Long Bridge when everyone drew their breaths as Phil Hill passed Jim Clark and Roly Levis would get the blame for running into Jack Brabham and costing him the win.
It might be prudent to look at the Long Bridge at this time, just to put emphasis on Phil Hill's move on Clark and to give more character to the whole event...

The Long Bridge. A real 'character builder' on the circuit, and almost exactly halfway around the 4.5 miles of public roads dressed up by the Tasmanian Government to enhance this big annual opportunity to attract visitors from 'the Mainland'. This pic is from the heat from which grid times were derived, the Examiner Trophy over ten laps on the Saturday, Bib Stillwell is seen ahead of Frank Gardner and Jim Clark as they lap Lyn Archer's little Elfin.
...and gain some further appreciation of the dangers faced on this public-road circuit.
A few facts I am looking for to complete my search are:
1. How and where did Jack Hobden get ahead of the Scott/Levis dice and how many laps did he complete.
2. Similar details about John McDonald, though he was always ahead of Scott and Levis.
3. Anything about Mel McEwin's race or result.
4. A real off-chance - a lap chart of the race.
Donn Anderson was there, I'm sure, so the Motorman report should be a good and comprehensive one from which I might derive these tid-bits and perhaps other information.
Other magazine reports which might help would be in Modern Motor, Sports Car World and Tasmanian Motorist.
I wonder if anyone can help with any of these things?
 Posting Permissions
- You may not post new threads
- You may not post replies
- You may not post attachments
- You may not edit your posts
-
Forum Rules


 Reply With Quote